🎬 写在前面
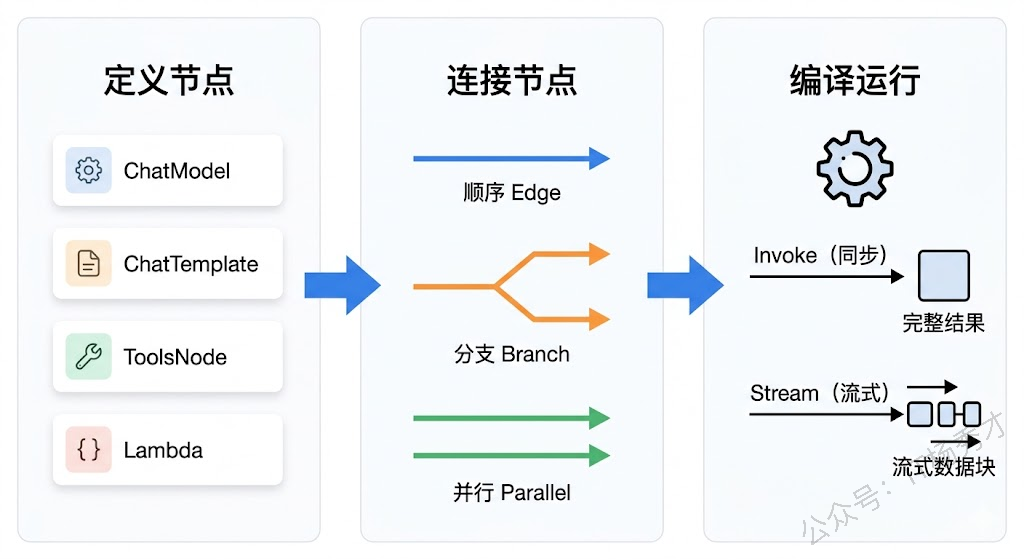
当我们构建 LLM 应用时,很少是单独调用一个组件就能完成任务的。更常见的场景是:从文档加载器读取内容,通过解析器转换格式,用分割器切分段落,向量化后存储到数据库,然后根据用户问题检索相关内容,拼接成 Prompt,调用大模型生成回答,必要时还要调用外部工具……这是一个完整的数据流转链路,每个环节都有明确的输入输出,环环相扣。
问题来了:如何把这些组件串联起来?如何保证上游的输出能被下游正确接收?如何处理分支逻辑(比如根据用户意图选择不同的处理路径)?如何管理跨节点的全局状态?这就是编排系统要解决的核心问题。
Eino 提供了三种编排方式:Chain(链式编排)、Graph(图式编排)、Workflow(工作流编排)。它们的抽象层次递增,适用场景不同。Chain 适合简单的线性流程,Graph 支持复杂的分支和循环,Workflow 则提供了更高级的字段级映射和状态管理。
这篇文章聚焦前两者:Chain 和 Graph。我们会从 Eino 编排系统的设计理念讲起,理解类型对齐这一核心原则,然后通过实战代码看懂 Graph 和 Chain 的使用方法,最后探讨它们的高级特性和选择策略。如果你正在用 Eino 做 RAG 应用或者 Agent 开发,这篇文章会帮你理解整个编排体系的底层逻辑。
🧭 编排系统的核心理念
🎲 类型对齐原则
Eino 编排系统的设计建立在一个简单但关键的原则之上:上游节点的输出类型必须能够赋值给下游节点的输入类型。
这听起来像是废话——当然要类型匹配啊!但在动态类型语言(比如 Python)的框架中,这个问题往往被掩盖了。LangChain 的做法是把所有数据都封装成 dict(Python 的字典),每个组件从 dict 中按 key 取值,运行时才知道类型对不对。这种方式虽然灵活,但带来两个问题:
- 运行时才发现错误:你写完代码,运行起来,某个节点访问了不存在的 key 或者类型不对,程序崩溃。调试成本高。
- 代码可读性差:到处都是
data["key"] 的访问,你不知道这个 key 的值是什么类型,IDE 也无法提供类型提示。
Eino 选择了另一条路:利用 Go 的静态类型系统,在编译期就检查类型对齐。每个节点的输入输出类型都是明确的,编排时框架会检查上下游类型是否匹配,不匹配直接报错,根本跑不起来。
这就像搭积木:每个积木块的凸起和凹槽都有固定的规格,只有规格匹配的块才能拼在一起。Eino 的编排就是这样——类型对了,才能连边;类型不对,编译器直接告诉你哪里错了。
🏛️ 静态类型的优势
Eino 的类型对齐机制依赖 Go 的泛型(Generics)。我们来看一个对比:
Python LangChain 的方式:
 1
 2
 3
 4
 5
 6
 7
 8
 9
10
| def node1(input: dict) -> dict:
# 处理输入
return {"result": "hello"}
def node2(input: dict) -> str:
# 假设上游输出了 "result" 这个 key
return input["result"] # 运行时可能 KeyError
# 编排
chain = node1 | node2
|
你看不出 node1 输出的 dict 里有什么字段,node2 需要什么字段,只能靠文档或者运行时调试。
Eino 的方式:
 1
 2
 3
 4
 5
 6
 7
 8
 9
10
11
12
13
| // node1 的输出类型是 string
node1 := compose.InvokableLambda(func(ctx context.Context, input map[string]any) (string, error) {
return "hello", nil
})
// node2 的输入类型是 string,与 node1 输出类型匹配
node2 := compose.InvokableLambda(func(ctx context.Context, input string) (int, error) {
return len(input), nil
})
// 编排
chain := compose.NewChain[map[string]any, int]()
chain.AppendLambda(node1).AppendLambda(node2)
|
类型一目了然:node1 输出 string,node2 输入 string,类型对齐,编译通过。如果你把 node2 的输入改成 int,编译器立刻报错。
这种设计的好处是:
- 提前发现错误:类型不匹配在编译期就暴露,不用等到运行时崩溃。
- 代码可读性强:每个节点的输入输出类型都明确标注,团队协作时不会产生歧义。
- IDE 友好:类型提示、自动补全、重构工具都能正常工作。
当然,静态类型也有代价——你必须在编排时就确定好每个节点的类型。但对于复杂的 LLM 应用来说,这点"不灵活"换来的是更高的工程质量和可维护性,非常值得。
⛓️ Chain 链式编排
Chain 是 Graph 的简化封装,专为线性流程设计。如果你的应用逻辑是"一步接一步"的,用 Chain 会更简洁。Chain 是最简单的编排方式——把多个节点像糖葫芦一样串起来,数据从第一个节点流入,依次经过每个节点处理,最后从最后一个节点流出。上一个节点的输出就是下一个节点的输入,中间不需要你操心数据怎么传递。
📏 Chain 的本质
从抽象角度看,Chain 就是一条链:
1
| 输入 → 节点1 → 节点2 → 节点3 → ... → 输出
|
每个节点可以是组件、Lambda、分支、并行等。Chain 在底层其实也是用 Graph 实现的,只是提供了更友好的 API。
🛠️ Chain 的构建
Chain 的 API 风格是"流式调用":
1
2
3
4
5
6
7
8
9
| chain := compose.NewChain[map[string]any, string]()
chain.
AppendChatTemplate(promptTemplate). // 添加 Prompt 节点
AppendChatModel(chatModel). // 添加 Model 节点
AppendLambda(extractContent) // 添加 Lambda 节点
runnable, _ := chain.Compile(ctx)
result, _ := runnable.Invoke(ctx, input)
|
类型推导:Chain 会自动检查每个 Append 方法的类型对齐。假设 promptTemplate 输出 []*Message,chatModel 输入必须是 []*Message,否则编译报错。
🌿 分支节点
Chain 也支持分支,但语法稍有不同:
 1
 2
 3
 4
 5
 6
 7
 8
 9
10
11
12
13
14
15
16
17
18
19
20
21
22
23
24
25
26
| // 定义分支条件
branchCond := func(ctx context.Context, input map[string]any) (string, error) {
if rand.Intn(2) == 1 {
return "b1", nil
}
return "b2", nil
}
// 定义各分支的处理逻辑
b1 := compose.InvokableLambda(func(ctx context.Context, kvs map[string]any) (map[string]any, error) {
kvs["role"] = "cat"
return kvs, nil
})
b2 := compose.InvokableLambda(func(ctx context.Context, kvs map[string]any) (map[string]any, error) {
kvs["role"] = "dog"
return kvs, nil
})
// 添加到 Chain
chain := compose.NewChain[map[string]any, map[string]any]()
chain.AppendBranch(
compose.NewChainBranch(branchCond).
AddLambda("b1", b1).
AddLambda("b2", b2),
)
|
分支节点创建函数签名:
1
2
| // 创建分支节点
func NewChainBranch[T any](condition func(ctx context.Context, input T) (string, error)) *ChainBranch[T]
|
其中泛型参数 T 是分支节点的输入类型,必须与上游节点的输出类型一致。
分支条件函数签名:
分支条件函数的签名必须符合以下格式:
1
| func(ctx context.Context, input T) (string, error)
|
其中:
input T 的类型 T 必须与上游节点的输出类型一致- 返回的
string 是分支名称,用于选择执行哪个分支 - 返回的分支名称必须在
AddLambda/AddChatModel 等方法中已定义
 1
 2
 3
 4
 5
 6
 7
 8
 9
10
11
12
| // 1. 创建分支对象
branch := compose.NewChainBranch(branchCondFunc)
// 2. 添加分支路径(支持链式调用)
branch.
AddLambda("branchName1", lambda1).
AddLambda("branchName2", lambda2).
AddChatModel("branchName3", chatModel).
AddChatTemplate("branchName4", template)
// 3. 将分支添加到 Chain
chain.AppendBranch(branch)
|
NewChainBranch 接受一个分支条件函数,返回 ChainBranch 对象。该对象提供以下方法添加分支路径:
AddLambda(name string, lambda Lambda) *ChainBranch:添加 Lambda 节点作为分支AddChatModel(name string, model ChatModel) *ChainBranch:添加 ChatModel 节点作为分支AddChatTemplate(name string, template ChatTemplate) *ChainBranch:添加 ChatTemplate 节点作为分支AddRetriever(name string, retriever Retriever) *ChainBranch:添加 Retriever 节点作为分支
每个 Add* 方法的 name 参数必须与分支条件函数可能返回的字符串对应。
分支添加方法:
ChainBranch 提供了多种添加分支路径的方法:
 1
 2
 3
 4
 5
 6
 7
 8
 9
10
11
| // 添加 Lambda 分支
func (cb *ChainBranch[T]) AddLambda(name string, lambda Runnable) *ChainBranch[T]
// 添加 ChatModel 分支
func (cb *ChainBranch[T]) AddChatModel(name string, model ChatModel) *ChainBranch[T]
// 添加 ChatTemplate 分支
func (cb *ChainBranch[T]) AddChatTemplate(name string, template ChatTemplate) *ChainBranch[T]
// 添加子 Graph/Chain 分支
func (cb *ChainBranch[T]) AddGraph(name string, graph Runnable) *ChainBranch[T]
|
每个方法的 name 参数必须与条件函数可能返回的分支名称对应。
使用注意事项:
分支汇聚:分支执行后,所有分支的出口都会汇聚到下一个节点。这是 Chain 和 Graph 的一个区别——Graph 中可以让不同分支连到不同节点,Chain 必须汇聚。
类型一致性:所有分支的输出类型必须相同,且能赋值给下游节点的输入类型。例如,如果 b1 输出 map[string]any,b2 也必须输出 map[string]any。
分支名称匹配:条件函数返回的字符串必须与 AddLambda("b1", ...) 中定义的名称严格一致,否则运行时会报错"未找到分支"。
默认分支:如果条件函数返回了未定义的分支名称,框架会返回错误。建议在条件函数中添加 default 分支处理:
 1
 2
 3
 4
 5
 6
 7
 8
 9
10
11
12
13
14
15
| branchCond := func(ctx context.Context, input map[string]any) (string, error) {
userType, ok := input["type"].(string)
if !ok {
return "default", nil // 兜底分支
}
switch userType {
case "premium":
return "premium_branch", nil
case "standard":
return "standard_branch", nil
default:
return "default", nil
}
}
|
- 错误处理:如果条件函数返回 error,整个 Chain 执行会中断并向上传播该错误。
🔁 并行节点
Parallel 节点让多个任务同时执行,结果汇总成 map[string]any:
 1
 2
 3
 4
 5
 6
 7
 8
 9
10
11
12
13
| // 创建并行节点
parallel := compose.NewParallel()
parallel.
AddLambda("role", compose.InvokableLambda(func(ctx context.Context, kvs map[string]any) (string, error) {
role, _ := kvs["role"].(string)
return role, nil
})).
AddLambda("input", compose.InvokableLambda(func(ctx context.Context, kvs map[string]any) (string, error) {
return "What does your call sound like?", nil
}))
// 添加到 Chain
chain.AppendParallel(parallel)
|
并行节点创建函数签名:
1
| func NewParallel() *Parallel
|
并行分支添加函数签名:
1
2
3
4
5
| func (p *Parallel) AddLambda(name string, lambda Runnable) *Parallel
func (p *Parallel) AddChatModel(name string, model ChatModel) *Parallel
func (p *Parallel) AddChatTemplate(name string, template ChatTemplate) *Parallel
func (p *Parallel) AddRetriever(name string, retriever Retriever) *Parallel
func (p *Parallel) AddGraph(name string, graph Runnable) *Parallel
|
其中 name 就是并行输出里的 key,也就是最终 map[string]any 的字段名。
使用事项:
- 输入类型必须对齐:并行里的每个分支都共享同一个上游输入,所以每个节点都要能接收这份输入。
- 输出统一收口:Parallel 的输出固定是
map[string]any,key 来自 AddXXX(name, ...),value 是对应节点的输出。 - 名称必须唯一:同一个 Parallel 里不要重复使用相同的
name,否则会覆盖结果或引发错误。 - 不要把并行当成分支:Parallel 是“同时跑多个节点”,不是“根据条件只跑其中一个节点”;要做条件选择请用 Branch。
- 当前不支持嵌套并行/分支:官方设计里,Parallel 内部不直接提供再嵌套 Branch 或 Parallel 的能力。
🎭 完整示例
下面是一个完整的 Chain 示例,结合了分支、并行和模型调用:
 1
 2
 3
 4
 5
 6
 7
 8
 9
10
11
12
13
14
15
16
17
18
19
20
21
22
23
24
25
26
27
28
29
30
31
32
33
34
35
36
37
38
39
40
41
42
43
44
45
46
47
48
49
50
51
52
53
54
55
56
57
| func main() {
ctx := context.Background()
// 1. 定义分支逻辑
branchCond := func(ctx context.Context, input map[string]any) (string, error) {
if rand.Intn(2) == 1 {
return "b1", nil
}
return "b2", nil
}
b1 := compose.InvokableLambda(func(ctx context.Context, kvs map[string]any) (map[string]any, error) {
kvs["role"] = "cat"
return kvs, nil
})
b2 := compose.InvokableLambda(func(ctx context.Context, kvs map[string]any) (map[string]any, error) {
kvs["role"] = "dog"
return kvs, nil
})
// 2. 定义并行节点
parallel := compose.NewParallel()
parallel.
AddLambda("role", compose.InvokableLambda(func(ctx context.Context, kvs map[string]any) (string, error) {
role, _ := kvs["role"].(string)
return role, nil
})).
AddLambda("input", compose.InvokableLambda(func(ctx context.Context, kvs map[string]any) (string, error) {
return "What does your call sound like?", nil
}))
// 3. 创建模型和 Prompt
cm, _ := openai.NewChatModel(ctx, &openai.ChatModelConfig{/* ... */})
rolePlayerChain := compose.NewChain[map[string]any, *schema.Message]()
rolePlayerChain.
AppendChatTemplate(prompt.FromMessages(schema.FString,
schema.SystemMessage(`You are a {role}.`),
schema.UserMessage(`{input}`),
)).
AppendChatModel(cm)
// 4. 构建完整 Chain
chain := compose.NewChain[map[string]any, string]()
chain.
AppendBranch(compose.NewChainBranch(branchCond).AddLambda("b1", b1).AddLambda("b2", b2)).
AppendParallel(parallel).
AppendGraph(rolePlayerChain). // 嵌套另一个 Chain
AppendLambda(compose.InvokableLambda(func(ctx context.Context, m *schema.Message) (string, error) {
return m.Content, nil
}))
// 5. 编译并执行
runnable, _ := chain.Compile(ctx)
output, _ := runnable.Invoke(ctx, map[string]any{})
fmt.Println("output:", output)
}
|
这个例子的流程:
- 输入 → 分支(随机选择 cat 或 dog 角色)
- 并行提取
role 和 input 两个字段 - 传给嵌套的 Chain(Prompt + Model)
- 提取模型输出的 Content
🕸️ Graph 图式编排
Graph 是 Eino 编排系统的核心抽象。它把应用建模成一个有向图:节点代表逻辑单元(组件、Lambda、分支),边代表数据流向。
🧱 节点与边
节点(Node) 是 Graph 中的执行单元,可以是:
- 组件节点:ChatModel、Retriever、Loader、Transformer 等 Eino 组件
- Lambda 节点:自定义的业务逻辑函数
- 分支节点:根据条件选择不同的下游路径
- 工具节点:ToolsNode,用于 Function Calling 场景
边(Edge) 定义了节点之间的连接关系,表示数据从一个节点流向另一个节点。Eino 中有两个特殊节点:
compose.START:Graph 的入口,表示数据从哪里开始流入compose.END:Graph 的出口,表示数据流向哪里结束
每条边都有类型约束:起始节点的输出类型必须能赋值给目标节点的输入类型。
🛣️ 分支节点
Graph 里的分支,适合处理“先判断,再走不同路径”的场景。比如意图识别、工具选择、错误兜底,都是典型的分支逻辑。
Graph 的分支本质上是“控制流 + 数据流”一起走。分支条件决定下一跳节点,而选中的节点会直接拿到上游输出作为输入。
分支条件函数签名:
1
2
| type GraphBranchCondition[T any] func(ctx context.Context, in T) (endNode string, err error)
type StreamGraphBranchCondition[T any] func(ctx context.Context, in *schema.StreamReader[T]) (endNode string, err error)
|
分支构造函数签名:
1
2
3
4
| func NewGraphBranch[T any](condition GraphBranchCondition[T], endNodes map[string]bool) *GraphBranch
func NewStreamGraphBranch[T any](condition StreamGraphBranchCondition[T], endNodes map[string]bool) *GraphBranch
func NewGraphMultiBranch[T any](condition GraphMultiBranchCondition[T], endNodes map[string]bool) *GraphBranch
func NewStreamGraphMultiBranch[T any](condition StreamGraphMultiBranchCondition[T], endNodes map[string]bool) *GraphBranch
|
添加分支到图的签名:
1
| func (g *Graph[I, O]) AddBranch(startNode string, branch *GraphBranch) (err error)
|
如果需要一次命中多个出口,可以使用:
1
2
| type GraphMultiBranchCondition[T any] func(ctx context.Context, in T) (endNode map[string]bool, err error)
type StreamGraphMultiBranchCondition[T any] func(ctx context.Context, in *schema.StreamReader[T]) (endNodes map[string]bool, err error)
|
使用事项:
endNodes 要预先声明允许的出口节点,条件函数只能返回其中的值。- 条件函数返回的
string 必须和出口节点名一致,否则编译/执行时会报错。 - Graph 分支会把上游输入直接传给被选中的分支节点,不需要你手动再做一次输入映射。
- 如果分支输入是流式数据,就要使用
NewStreamGraphBranch 和 *schema.StreamReader[T]。 - 如果一个分支需要同时命中多个出口,用 MultiBranch,不要硬塞进单值分支里。
- 分支条件返回
error 时,这次图执行会直接中断。
🧵 并行节点
Graph 里的并行,适合把同一个输入同时送到多个节点,做多路处理或结果对比。比如多个召回源、多个模型对比、多个字段提取,都是常见用法。
Graph 本身没有一个单独叫 Parallel 的节点构造器,并行通常是通过一对多连边来表达的。
并行相关签名:
1
2
| func (g *Graph[I, O]) AddEdge(startNode, endNode string) (err error)
func (g *Graph[I, O]) AddPassthroughNode(key string, opts ...GraphAddNodeOpt) error
|
使用方式:
1
2
3
| _ = g.AddEdge("source", "node_a")
_ = g.AddEdge("source", "node_b")
_ = g.AddEdge("source", "node_c")
|
使用事项:
- 并行分支共享同一个上游输出,所以每个下游节点都必须能接收这份输入。
- 并行不是分支选择,不会“只走一条”;它是多条路径同时被触发。
- 如果你要在后面收口,汇聚节点的输入类型要能同时接住这些上游结果。
- 需要中间占位时,可以用
AddPassthroughNode 帮助整理图结构。 - 如果你想要的是 Chain 里的
Parallel 语义,那是另一层封装;Graph 这里表达的是拓扑结构本身。
🌟 基础示例:天气查询
让我们从一个最简单的例子开始,理解 Graph 的基本用法:
 1
 2
 3
 4
 5
 6
 7
 8
 9
10
11
12
13
14
15
16
17
18
19
20
21
22
23
24
25
26
27
28
29
30
31
32
33
34
35
36
37
38
39
40
41
42
43
44
45
46
47
48
49
50
51
52
53
54
55
56
57
58
59
60
61
62
| import (
"context"
"github.com/cloudwego/eino/components/model"
"github.com/cloudwego/eino/components/prompt"
"github.com/cloudwego/eino/compose"
"github.com/cloudwego/eino/schema"
)
func main() {
ctx := context.Background()
// 1. 创建 Graph,指定输入输出类型
// 输入:map[string]any,输出:*schema.Message
g := compose.NewGraph[map[string]any, *schema.Message]()
// 2. 创建 ChatTemplate 节点
pt := prompt.FromMessages(
schema.FString,
schema.UserMessage("what's the weather in {location}?"),
)
// 3. 创建 ChatModel 节点(这里用 mock 代替真实模型)
chatModel := &mockChatModel{}
// 4. 添加节点到 Graph
_ = g.AddChatTemplateNode("prompt", pt)
_ = g.AddChatModelNode("model", chatModel)
// 5. 添加边,定义数据流向
_ = g.AddEdge(compose.START, "prompt") // 输入 → prompt
_ = g.AddEdge("prompt", "model") // prompt → model
_ = g.AddEdge("model", compose.END) // model → 输出
// 6. 编译 Graph,生成可执行的 Runnable
runnable, err := g.Compile(ctx)
if err != nil {
panic(err)
}
// 7. 执行
input := map[string]any{"location": "beijing"}
result, err := runnable.Invoke(ctx, input)
fmt.Println("result:", result.Content) // 输出: the weather is good
}
// Mock ChatModel
type mockChatModel struct{}
func (m *mockChatModel) Generate(ctx context.Context, input []*schema.Message, opts ...model.Option) (*schema.Message, error) {
return schema.AssistantMessage("the weather is good", nil), nil
}
func (m *mockChatModel) Stream(ctx context.Context, input []*schema.Message, opts ...model.Option) (*schema.StreamReader[*schema.Message], error) {
// 实现流式输出
sr, sw := schema.Pipe[*schema.Message](0)
go func() {
defer sw.Close()
sw.Send(schema.AssistantMessage("the weather is ", nil), nil)
sw.Send(schema.AssistantMessage("good", nil), nil)
}()
return sr, nil
}
|
关键点:
- Graph 的泛型参数
[map[string]any, *schema.Message] 定义了整个 Graph 的输入输出类型 AddChatTemplateNode 添加 Prompt 节点,输入是 map[string]any,输出是 []*schema.MessageAddChatModelNode 添加模型节点,输入是 []*schema.Message,输出是 *schema.Message- 类型链:
map[string]any → []*schema.Message → *schema.Message,完美对齐 Compile() 后得到 Runnable,可以用 Invoke 或 Stream 方法执行
现在看一个更复杂的场景:模型调用工具(Function Calling)。这是 Agent 应用的核心能力。
 1
 2
 3
 4
 5
 6
 7
 8
 9
10
11
12
13
14
15
16
17
18
19
20
21
22
23
24
25
26
27
28
29
30
31
32
33
34
35
36
37
38
39
40
41
42
43
44
45
46
47
48
49
50
51
52
53
54
55
56
57
58
59
60
61
62
63
64
65
66
67
68
69
70
71
72
73
74
75
76
| import (
"github.com/cloudwego/eino-ext/components/model/openai"
"github.com/cloudwego/eino/components/tool"
"github.com/cloudwego/eino/components/tool/utils"
)
func buildToolCallAgent(ctx context.Context) {
// 1. 创建 Prompt Template
systemTpl := `You are a real estate agent. Use user_info API to provide property information based on user's salary.`
chatTpl := prompt.FromMessages(schema.FString,
schema.SystemMessage(systemTpl),
schema.MessagesPlaceholder("message_histories", true),
schema.UserMessage("{user_query}"),
)
// 2. 创建 ChatModel
chatModel, _ := openai.NewChatModel(ctx, &openai.ChatModelConfig{
BaseURL: os.Getenv("OPENAI_BASE_URL"),
APIKey: os.Getenv("OPENAI_API_KEY"),
Model: "gpt-4",
})
// 3. 创建工具
userInfoTool := utils.NewTool(
&schema.ToolInfo{
Name: "user_info",
Desc: "Query user's company, position, and salary based on name and email",
ParamsOneOf: schema.NewParamsOneOfByParams(map[string]*schema.ParameterInfo{
"name": {Type: "string", Desc: "User's name"},
"email": {Type: "string", Desc: "User's email"},
}),
},
func(ctx context.Context, input *userInfoRequest) (*userInfoResponse, error) {
return &userInfoResponse{
Name: input.Name,
Email: input.Email,
Company: "Bytedance",
Position: "CEO",
Salary: "9999",
}, nil
},
)
// 4. 绑定工具到模型
toolInfo, _ := userInfoTool.Info(ctx)
_ = chatModel.BindForcedTools([]*schema.ToolInfo{toolInfo})
// 5. 创建 ToolsNode
toolsNode, _ := compose.NewToolNode(ctx, &compose.ToolsNodeConfig{
Tools: []tool.BaseTool{userInfoTool},
})
// 6. 构建 Graph
g := compose.NewGraph[map[string]any, []*schema.Message]()
_ = g.AddChatTemplateNode("template", chatTpl)
_ = g.AddChatModelNode("chat_model", chatModel)
_ = g.AddToolsNode("tools", toolsNode)
_ = g.AddEdge(compose.START, "template")
_ = g.AddEdge("template", "chat_model")
_ = g.AddEdge("chat_model", "tools")
_ = g.AddEdge("tools", compose.END)
// 7. 编译并执行
runnable, _ := g.Compile(ctx)
output, _ := runnable.Invoke(ctx, map[string]any{
"message_histories": []*schema.Message{},
"user_query": "My name is zhangsan, email is zhangsan@bytedance.com, recommend a property for me",
})
for _, msg := range output {
fmt.Printf("Message: %v\n", msg)
}
}
|
这个例子展示了:
- Prompt Template 中使用
MessagesPlaceholder 支持历史消息 BindForcedTools 强制模型使用指定工具- ToolsNode 负责解析模型输出的 tool call,执行工具,返回结果
- 类型链:
map[string]any → []*Message → *Message → []*Message(ToolsNode 输出是消息列表)
🔀 分支与循环
Graph 的强大之处在于支持分支和循环。比如 ReAct Agent 的典型流程:
1
2
3
| START → Prompt → Model → 判断 →
├─ 需要工具 → ToolsNode → 回到 Model(循环)
└─ 不需要工具 → END
|
这种循环逻辑用 Branch 实现:
 1
 2
 3
 4
 5
 6
 7
 8
 9
10
11
12
13
14
15
16
| // 创建分支条件函数
shouldUseTool := func(ctx context.Context, msg *schema.Message) (string, error) {
if len(msg.ToolCalls) > 0 {
return "use_tool", nil // 需要调用工具
}
return "finish", nil // 直接结束
}
// 添加分支
_ = g.AddBranch("decision", shouldUseTool, []string{"use_tool", "finish"})
// 连接边
_ = g.AddEdge("model", "decision")
_ = g.AddEdge("decision", "tools", compose.BranchCase("use_tool"))
_ = g.AddEdge("tools", "model") // 工具执行后回到模型(形成循环)
_ = g.AddEdge("decision", compose.END, compose.BranchCase("finish"))
|
分支节点的条件函数返回一个字符串,表示选择哪条路径。只有匹配的路径会被执行。
⚙️ 编译与执行
🧪 Compile 的执行过程
Compile 不只是简单地把节点串起来,它在编译阶段做了不少重要的事情:类型检查——验证相邻节点的输入输出类型是否兼容;连通性检查——确保从 START 到 END 有完整的路径,不存在孤立节点;环检测——Graph 只支持 DAG,如果你不小心画了一个环,编译时就会报错。这些检查帮你把配置错误提前暴露在编译阶段,避免运行时出现莫名其妙的问题。
编译后得到的 Runnable 对象是线程安全的,你可以在多个 goroutine 中并发调用它,不需要额外的锁。在实际项目中,通常是程序启动时编译一次,之后反复运行。
🚀 Invoke 和 Stream
编译后的 Runnable 提供两种调用方式。Invoke 是同步调用,等所有节点执行完毕后一次性返回最终结果,适合需要完整结果的场景。Stream 是流式调用,返回一个 StreamReader,你可以逐块读取输出,适合对响应速度要求高的交互场景——比如聊天界面里一个字一个字地输出。
🔧 类型对齐机制详解
✔️ 对齐规则
Eino 支持三种类型对齐方式:
1. 相同类型对齐
最直接的方式:上游输出 T,下游输入也是 T。
 1
 2
 3
 4
 5
 6
 7
 8
 9
10
11
| // 上游输出 string,下游输入 string
node1 := compose.InvokableLambda(func(ctx context.Context, input int) (string, error) {
return "hello", nil
})
node2 := compose.InvokableLambda(func(ctx context.Context, input string) (int, error) {
return len(input), nil
})
chain := compose.NewChain[int, int]()
chain.AppendLambda(node1).AppendLambda(node2) // ✅ 类型对齐
|
2. 接口对齐
下游接受接口,上游实现该接口。
 1
 2
 3
 4
 5
 6
 7
 8
 9
10
11
12
13
14
15
16
17
18
| type Formatter interface {
Format() string
}
type MyStruct struct{}
func (m *MyStruct) Format() string { return "formatted" }
// 上游输出 *MyStruct,下游接受 Formatter 接口
node1 := compose.InvokableLambda(func(ctx context.Context, input int) (*MyStruct, error) {
return &MyStruct{}, nil
})
node2 := compose.InvokableLambda(func(ctx context.Context, input Formatter) (string, error) {
return input.Format(), nil
})
chain := compose.NewChain[int, string]()
chain.AppendLambda(node1).AppendLambda(node2) // ✅ *MyStruct 实现了 Formatter
|
3. any 类型
下游接受 any(空接口),任何类型都能赋值。
 1
 2
 3
 4
 5
 6
 7
 8
 9
10
11
| node1 := compose.InvokableLambda(func(ctx context.Context, input int) (string, error) {
return "hello", nil
})
node2 := compose.InvokableLambda(func(ctx context.Context, input any) (string, error) {
str, _ := input.(string)
return str, nil
})
chain := compose.NewChain[int, string]()
chain.AppendLambda(node1).AppendLambda(node2) // ✅ string 可以赋值给 any
|
🔄 自动转换
Eino 在 Stream 模式下会自动拼接流式输出。比如:
*StreamReader[*Message] → *Message:自动拼接所有 chunk*StreamReader[string] → string:自动拼接所有字符串*StreamReader[[]*Message] → []*Message:拼接消息数组
这意味着你可以在 Graph 中混用流式和非流式节点:
 1
 2
 3
 4
 5
 6
 7
 8
 9
10
11
| // ChatModel 输出 *StreamReader[*Message]
_ = g.AddChatModelNode("model", chatModel)
// Lambda 输入 *Message(非流式)
lambda := compose.InvokableLambda(func(ctx context.Context, msg *schema.Message) (string, error) {
return msg.Content, nil
})
_ = g.AddLambdaNode("extract", lambda)
// 连边时,Eino 自动拼接流式输出
_ = g.AddEdge("model", "extract") // ✅ 自动转换
|
框架内置支持拼接的类型:
*schema.Messagestring[]*schema.Messagemap[string]any(合并相同 key 的值)
如果需要自定义拼接逻辑,可以注册自己的 concat 函数:
1
2
3
4
5
6
| func concatMyType(items []*MyType) (*MyType, error) {
// 自定义拼接逻辑
return &MyType{}, nil
}
compose.RegisterStreamChunkConcatFunc(concatMyType)
|
有时候上下游类型不完全匹配,但可以通过 map[string]any 转换。Eino 提供了两个 Option:
WithOutputKey:把节点输出转换成 map[string]any
1
2
| // 节点输出 string,用 OutputKey 转换成 map[string]any{"result": "hello"}
_ = g.AddLambdaNode("node1", lambda1, compose.WithOutputKey("result"))
|
WithInputKey:从 map[string]any 中取值作为节点输入
1
2
| // 节点输入 string,从 map["result"] 中取值
_ = g.AddLambdaNode("node2", lambda2, compose.WithInputKey("result"))
|
这在多个上游汇聚到一个下游时特别有用:
 1
 2
 3
 4
 5
 6
 7
 8
 9
10
11
| // node1 输出 string,用 OutputKey 转成 map
_ = g.AddLambdaNode("node1", lambda1, compose.WithOutputKey("key1"))
// node2 输出 int,用 OutputKey 转成 map
_ = g.AddLambdaNode("node2", lambda2, compose.WithOutputKey("key2"))
// node3 输入 map[string]any,自动合并上游的两个 map
_ = g.AddLambdaNode("node3", lambda3)
_ = g.AddEdge("node1", "node3")
_ = g.AddEdge("node2", "node3") // 两个上游汇聚
|
🏗️ Graph 高级特性
💾 全局状态管理
有些场景需要在多个节点间共享数据,但又不想通过输入输出传递(比如累计某些统计信息、缓存中间结果)。Graph 提供了全局状态机制。
启用全局状态:
 1
 2
 3
 4
 5
 6
 7
 8
 9
10
| type MyState struct {
messages []string
}
// 创建 Graph 时传入状态生成函数
g := compose.NewGraph[string, string](
compose.WithGenLocalState(func(ctx context.Context) *MyState {
return &MyState{messages: []string{}}
}),
)
|
这样,每次调用 Invoke 或 Stream 时,框架会创建一个请求级别的全局状态 *MyState,所有节点都能访问。
🎛️ StateHandler 机制
Eino 推荐通过 StatePreHandler 和 StatePostHandler 来读写状态:
StatePreHandler:在节点执行前修改输入,并访问状态
1
2
3
4
5
6
| preHandler := func(ctx context.Context, input string, state *MyState) (string, error) {
state.messages = append(state.messages, input) // 记录输入
return input, nil // 返回修改后的输入(或原样返回)
}
_ = g.AddLambdaNode("node1", lambda1, compose.WithStatePreHandler(preHandler))
|
StatePostHandler:在节点执行后修改输出,并访问状态
1
2
3
4
5
6
7
| postHandler := func(ctx context.Context, output string, state *MyState) (string, error) {
state.messages = append(state.messages, output) // 记录输出
fmt.Println("Current messages:", state.messages)
return output, nil
}
_ = g.AddLambdaNode("node1", lambda1, compose.WithStatePostHandler(postHandler))
|
在节点内部访问状态:
如果需要在节点逻辑内部读写状态,使用 compose.ProcessState:
 1
 2
 3
 4
 5
 6
 7
 8
 9
10
11
12
| lambda := compose.InvokableLambda(func(ctx context.Context, input string) (string, error) {
var result string
// 访问状态
err := compose.ProcessState[*MyState](ctx, func(ctx context.Context, state *MyState) error {
state.messages = append(state.messages, input)
result = strings.Join(state.messages, ", ")
return nil
})
return result, err
})
|
🧬 状态示例
完整示例:
 1
 2
 3
 4
 5
 6
 7
 8
 9
10
11
12
13
14
15
16
17
18
19
20
21
22
23
24
25
26
27
28
29
30
31
32
33
34
35
36
37
38
39
40
41
42
43
44
45
46
47
48
49
50
51
52
53
54
55
56
57
58
59
60
61
62
63
64
65
66
67
| type testState struct {
ms []string
}
func main() {
ctx := context.Background()
// 创建带状态的 Graph
g := compose.NewGraph[string, string](
compose.WithGenLocalState(func(ctx context.Context) *testState {
return &testState{}
}),
)
// 节点1:InvokableLambda
l1 := compose.InvokableLambda(func(ctx context.Context, in string) (string, error) {
return "InvokableLambda: " + in, nil
})
l1Pre := func(ctx context.Context, in string, state *testState) (string, error) {
state.ms = append(state.ms, in)
return in, nil
}
l1Post := func(ctx context.Context, out string, state *testState) (string, error) {
state.ms = append(state.ms, out)
return out, nil
}
_ = g.AddLambdaNode("l1", l1,
compose.WithStatePreHandler(l1Pre),
compose.WithStatePostHandler(l1Post),
)
// 节点2:StreamableLambda
l2 := compose.StreamableLambda(func(ctx context.Context, input string) (*schema.StreamReader[string], error) {
outStr := "StreamableLambda: " + input
sr, sw := schema.Pipe[string](len(outStr))
go func() {
for _, word := range strings.Fields(outStr) {
sw.Send(word+" ", nil)
}
sw.Close()
}()
return sr, nil
})
l2Post := func(ctx context.Context, out string, state *testState) (string, error) {
state.ms = append(state.ms, out)
fmt.Println("State after l2:", state.ms)
return out, nil
}
_ = g.AddLambdaNode("l2", l2, compose.WithStatePostHandler(l2Post))
// 连边
_ = g.AddEdge(compose.START, "l1")
_ = g.AddEdge("l1", "l2")
_ = g.AddEdge("l2", compose.END)
// 编译并执行
runnable, _ := g.Compile(ctx)
result, _ := runnable.Invoke(ctx, "how are you")
fmt.Println("Final result:", result)
}
|
状态的生命周期:
- 每次
Invoke/Stream 创建一个新的状态实例 - 状态在整个请求期间存在,所有节点共享
- 框架自动加锁,保证并发安全
⚖️ Chain vs Graph
📊 使用场景对比
| 特性 | Chain | Graph |
|---|
| 适用场景 | 简单线性流程 | 复杂分支、循环、多路汇聚 |
| API 风格 | 流式调用(Append) | 显式声明节点和边 |
| 类型推导 | 自动推导 | 需要手动指定泛型 |
| 分支支持 | 支持,但所有分支必须汇聚 | 支持,可以连到不同节点 |
| 循环支持 | 不支持 | 支持(通过 Branch 回环) |
| 状态管理 | 支持(底层是 Graph) | 原生支持 |
| 调试难度 | 简单,流程清晰 | 复杂,需要理解图结构 |
| 性能 | 略好(少一层抽象) | 相同(底层实现一致) |
🎯 选择建议
用 Chain 的场景:
- 流程简单,节点顺序固定(如:加载 → 解析 → 分割 → 向量化)
- 不需要复杂的分支逻辑
- 快速原型开发
- 团队不熟悉图式编排
用 Graph 的场景:
- 有复杂的条件分支(如:意图识别后走不同路径)
- 需要循环(如:ReAct Agent 的 Tool Calling 循环)
- 多个上游汇聚到一个下游(如:多路召回合并)
- 需要精细控制数据流向
- 需要全局状态管理
典型模式:
简单 RAG:用 Chain
1
| Query → Retriever → Prompt → Model → 输出
|
多路召回 RAG:用 Graph
1
| Query → [向量召回, 关键词召回, 规则召回] → 合并 → Rerank → Prompt → Model
|
ReAct Agent:用 Graph
1
| Query → Prompt → Model → 判断 → [需要工具 → ToolsNode → 回到 Model, 不需要 → END]
|
💡 最佳实践
1. 优先使用 Chain,必要时切换到 Graph
Chain 的代码更简洁,可读性更好。只有当你发现 Chain 无法表达你的逻辑时(比如需要循环),再切换到 Graph。
2. 类型明确,避免 any
虽然 Eino 支持 any 类型对齐,但尽量少用。明确的类型让代码更安全,也更容易维护。
3. 善用 InputKey/OutputKey
当多个上游汇聚到一个下游时,用 WithOutputKey 把各自的输出转成 map,避免类型冲突。
4. 状态管理谨慎使用
全局状态虽然方便,但会增加代码的隐式依赖。只在真正需要跨节点共享数据时才用,能通过输入输出传递的数据就不要放状态里。
5. 调试技巧
使用 Callback 机制记录每个节点的输入输出:
 1
 2
 3
 4
 5
 6
 7
 8
 9
10
| callbacks.AppendGlobalHandlers(&loggerCallbacks{
OnStart: func(ctx context.Context, info *callbacks.RunInfo, input callbacks.CallbackInput) context.Context {
log.Printf("[%s] Input: %v", info.Name, input)
return ctx
},
OnEnd: func(ctx context.Context, info *callbacks.RunInfo, output callbacks.CallbackOutput) context.Context {
log.Printf("[%s] Output: %v", info.Name, output)
return ctx
},
})
|
📝 总结
Eino 的编排系统通过 Chain 和 Graph 两种抽象,提供了从简单到复杂的编排能力。核心设计理念是类型对齐——利用 Go 的静态类型系统,在编译期就发现错误,避免运行时崩溃。
Chain 适合线性流程,API 简洁,类型自动推导,快速上手。Graph 支持复杂的分支、循环和多路汇聚,提供全局状态管理,适合构建复杂的 Agent 应用。
理解了这两种编排方式,你就掌握了 Eino 的核心能力。无论是构建 RAG 应用、多轮对话 Agent 还是复杂的工作流,都可以通过组合组件和编排逻辑来实现。
下一篇文章,我们会继续探讨 Eino 的第三种编排方式 Workflow,以及更高级的主题:流式处理、Callback 机制和性能优化。
参考资料: